
How to Clean Retainers with Baking Soda
Tired of expensive retainer cleaners? I was too, until I discovered the power of baking soda. After years of experimenting with different methods, I learned how to clean retainers with baking soda, and it’s been a game-changer for my oral care routine. This natural, budget-friendly solution effectively removes buildup while keeping your retainer fresh and hygienic.
If you’re looking for a gentle yet powerful cleaning method, you’re in the right place. As someone who’s tried countless commercial products, I can confidently say that baking soda offers an effective and affordable alternative. In this guide, I’ll share my personal experience and walk you through the entire process, along with extra tips I’ve picked up along the way.
Why Baking Soda Works: The Science Behind My Favorite Cleaner
I’ll never forget my dentist’s face when I told him I was using baking soda to clean my retainer. He actually smiled and said, “That’s exactly what I recommend!” As it turns out, there’s fascinating science behind why this simple kitchen ingredient works so well.
Like many of you, I used to think baking soda (or sodium bicarbonate, if we’re being fancy) was just for making cookies rise. But after researching and using it for years, I’ve learned it’s actually a cleaning superhero. Here’s what makes it so special for retainer cleaning:
Remember those science class lessons about pH levels? Well, baking soda has an alkaline pH of around 9, which helps neutralize all those acids that make our retainers smell funky and attract bacteria. Plus, it has this amazing ability to scrub away plaque and stains without being too harsh – something I discovered after ruining an expensive retainer with a too-aggressive commercial cleaner.
What I love most is how baking soda doesn’t just mask odors like some commercial cleaners do – it actually eliminates them. Trust me, after leaving my retainer in a hot car once (we’ve all been there!), I was amazed at how well baking soda rescued it from that not-so-fresh situation.
Why I Choose Baking Soda (And Never Looked Back)
Let me tell you about the moment I realized I was spending way too much on retainer cleaners. Standing in the drugstore, staring at a $15 cleaning solution, I remembered the box of baking soda sitting in my kitchen that cost less than $2. Talk about a lightbulb moment!
After switching to baking soda, I’ve saved hundreds of dollars over the years. That single box of baking soda can last for months of retainer cleaning, and the best part? You probably already have it at home. No more late-night runs to the pharmacy when you run out of cleaner – something I definitely don’t miss!
As someone with sensitive skin, I’ve always been wary of harsh chemicals in commercial cleaners. That’s another reason I fell in love with baking soda – it’s just pure sodium bicarbonate, no mystery ingredients or strong fragrances. My skin (and my wallet) couldn’t be happier with this natural alternative.
You might also be interested in my experience with natural teeth whitening remedies that work alongside a clean retainer to keep your smile bright. But that’s another story for another time!
My Two Favorite Ways to Clean Retainers with Baking Soda
Over the years, I’ve perfected two methods for cleaning my retainer with baking soda. Let me share both so you can choose what works best for you!
The Quick Clean: My Go-To Paste Method
I use this method during my morning routine when I’m short on time. Here’s my tried-and-true process:
- Mix one part baking soda with three parts water until you get a paste about the thickness of toothpaste. (Pro tip: I use a small dish dedicated just for this!)
- Take a soft-bristled toothbrush (I keep one specifically for my retainer) and gently apply the paste.
- Focus on those trouble spots where buildup loves to hide – for me, that’s usually around the wire bends.
- Use gentle circular motions for about 30 seconds. Trust me, you don’t need to scrub hard!
- Rinse thoroughly with cool water until it runs clear.
The Deep Clean: My Soaking Solution
When my retainer needs extra TLC, especially after being sick or if I’ve forgotten to clean it for a few days (hey, it happens!), here’s my deep-cleaning method:
- Mix a teaspoon of baking soda into a cup of warm (not hot!) water. I use my designated retainer cup for this.
- Let your retainer take a nice 15-30 minute bath in the solution. I usually do this while I’m watching TV or doing my skincare routine.
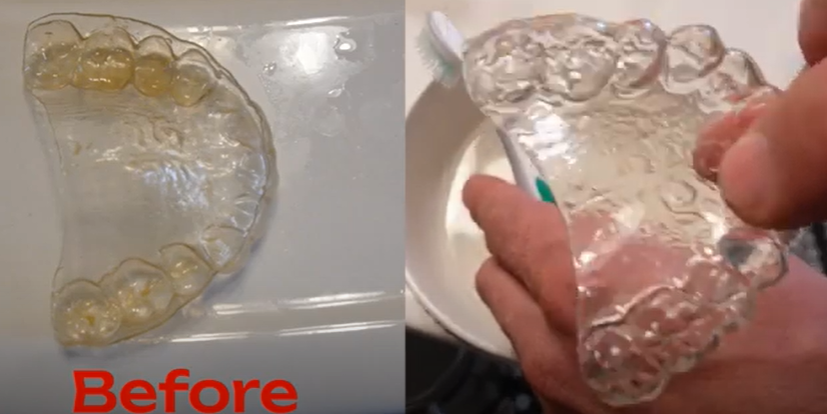
- After soaking, give it a gentle brush with a soft toothbrush – you’ll be amazed at how easily the buildup comes off!
- Finish with a thorough cool water rinse.
I prefer the paste method for daily cleaning and save the soaking method for weekly deep cleans. Both work great, but you might find you prefer one over the other depending on your schedule and cleaning style.
Friendly Tips From My Learning Experience
After accidentally scrubbing too hard in my early days (and learning the hard way!), I’ve picked up some important dos and don’ts that I wish someone had told me about cleaning retainers with baking soda.
Let me share my biggest lesson first: gentleness is key! While baking soda is amazing for cleaning, I discovered that too much enthusiasm can wear down retainer materials over time. Now, I limit my baking soda cleaning to twice a week at most, alternating with regular water rinses on other days. Trust me, your retainer will thank you for being gentle!
Speaking of lessons learned – ever bite into your retainer and taste baking soda? Not pleasant! That happened to me once when I rushed the rinsing process. Now I always make sure to rinse until the water runs completely clear. I actually hold my retainer up to the light to check for any white residue – a little trick I picked up after that tasty mistake!
For my sensitive-teeth friends (I feel your pain!), I’ve discovered some helpful workarounds. When I first noticed some sensitivity, I started diluting my baking soda mixture more than usual, and it made a huge difference. Instead of the standard mix, I now use about half the amount of baking soda when my teeth are feeling particularly sensitive. If you’re still experiencing discomfort, try cutting back to just once a week – sometimes less is more!
Making It Work Anywhere: My Travel Tips & Extra Tricks
Let’s talk about real-life situations – because life doesn’t stop just because you need to clean your retainer!
Travel-Smart Solutions
As someone who travels frequently for work, I’ve mastered the art of retainer care on the go. My favorite hack? I pre-mix a small batch of baking soda paste in a contact lens case (one side for the paste, one side for my regular cleaning needs). It’s compact, leakproof, and TSA-friendly. Trust me, it beats trying to pack a whole box of baking soda!
Cleaning Fixed Retainers with Baking Soda
For those of you with fixed retainers (I had one for years!), I know the struggle of cleaning around those pesky wires. Here’s what works for me: dip a soft toothbrush in the baking soda solution and clean with extra gentle, precise movements around the wire. Remember, slow and steady wins the race – we don’t want any loose wires!
Leveling Up Your Cleaning Game: My Experience with Add-Ins
After mastering the basic baking soda cleaning routine, I’ll admit – I went through an experimental phase. Like many of you might be wondering, I was curious about adding other natural ingredients to enhance my retainer cleaning routine. Let me share what I learned!
Tea Tree Oil: The Bacteria Fighter
When I developed a minor gum infection, my dental hygienist mentioned tea tree oil’s natural antimicrobial properties. I carefully added one drop of tea tree oil (literally just one!) to my baking soda soaking solution. While it worked well for my situation, I want to be upfront: this is something you should discuss with your dentist first, especially if you have sensitive gums or a history of oral health issues.
Peppermint Essential Oil: The Fresh Maker
I tried this one after a friend raved about the minty freshness it added. Yes, it makes your retainer smell amazing, but here’s my honest take: I found that using too much can actually irritate your mouth. If you want to try it, start with just a tiny drop of peppermint essential oil in your soaking solution.
A Word of Caution
After experimenting with various additions, I’ve actually gone back to just plain baking soda most of the time. While these natural add-ins can be beneficial in specific situations, they’re not necessary for everyday cleaning. Think of them as optional power-ups rather than essential ingredients.
My Daily Retainer Routine (And How Baking Soda Fits In)
After years of wearing retainers, I’ve finally nailed down a routine that keeps my retainer fresh without being overly complicated. Let me share how I integrate baking soda cleaning into my daily life!
My maintenance schedule looks something like this:
Every Day:
I’m religious about rinsing my retainer with cool water whenever I take it out. Think of it like wiping your feet before entering the house – it’s just a good habit! I also give it a gentle brush with a soft toothbrush before bed. Nothing fancy, just a quick clean to prevent buildup.
Once or Twice a Week:
This is when my trusty baking soda comes into play. Usually on Sunday evenings (while catching up on my favorite shows), I’ll do either the paste or soaking method. It’s become such a natural part of my routine that I don’t even think about it anymore.
The Monthly Deep Clean:
Once a month, usually on the first weekend, I treat my retainer to a spa day with a longer baking soda soak. I pop it in the solution while I’m doing my weekend cleaning or meal prep – multitasking at its finest!
I used to do professional cleanings every six months, but honestly? Since starting this baking soda routine, my orthodontist says my retainer maintenance is spot-on during my regular checkups. As long as you’re keeping up with the routine and your retainer looks and feels clean, the baking soda method works beautifully.
My Top Retainer Tips (Learned the Hard Way!)
After wearing retainers for years (and making plenty of mistakes along the way), I’ve collected some game-changing tips that I wish I’d known from day one. Let me share my hard-earned wisdom with you!
Temperature Matters
Trust me on this one – I learned about temperature sensitivity after accidentally warping my retainer with hot water. Always stick to lukewarm water when mixing your baking soda solution. Not too hot, not too cold – think Goldilocks!
Stay Consistent
Want to know my secret for never forgetting to clean? I set a recurring reminder on my phone for Sunday evenings. Now it’s as routine as my weekly meal prep. Plus, I keep a little container of pre-mixed baking soda paste right next to my toothbrush – it’s impossible to miss!
Handle with Care
Remember when your mom always told you to wash your hands? She was right! Clean hands are crucial when handling your retainer. I make it a habit to wash my hands right before touching mine – it’s just become second nature now.
Storage Smarts
Here’s a story that still makes me cringe: I once wrapped my retainer in a napkin at a restaurant and… you can guess what happened. Now I always carry my retainer case and treat it like my phone – it never leaves my sight when I’m out!
Watch for Warning Signs
When I noticed a tiny crack in my retainer, I thought it wasn’t a big deal. Spoiler alert: it was! Now I know to check regularly for any changes and contact my orthodontist at the first sign of damage. Better safe than sorry (and expensive!).
Fixing Common Problems: My Troubleshooting Guide
Over the years, I’ve encountered pretty much every retainer issue you can imagine. Let me share my tried-and-true solutions for the most common problems!
When Your Retainer Smells Funky
We’ve all been there – even with regular cleaning, sometimes retainers can get a bit… aromatic. My secret weapon? A quick vinegar soak before the baking soda treatment. I mix equal parts water and white vinegar (you can grab white vinegar here), let it soak for 15 minutes, then follow up with my usual baking soda routine. Works like a charm every time!
Battling Those Stubborn Stains
Remember that time I fell asleep wearing my retainer after drinking coffee? Hello, yellow stains! Here’s my emergency stain-fighting method: I make a paste with baking soda and a tiny bit of hydrogen peroxide. But here’s the important part – I always do a small test spot first because some retainer materials can be sensitive to hydrogen peroxide. A few minutes of spot treatment usually does the trick!
Dealing with White, Chalky Buildup
When I first noticed white spots on my retainer, I panicked. Turns out, it was just calcium buildup from saliva – totally normal! I tackle this with my “spa treatment”: a 15-minute soak in a mixture of equal parts warm water and white vinegar, followed by the regular baking soda clean. The calcium spots practically melt away!
Pro Tip: If you’re dealing with multiple issues (like both odor and stains), start with the vinegar soak first, then move on to stain treatment. I learned through trial and error that this order works best!
Why I Never Skip My Retainer Cleaning Routine
Let me share something I learned after investing thousands in orthodontic work – a consistent cleaning routine isn’t just about keeping your retainer sparkling clean. It’s about protecting your smile investment!
Think of your retainer like a gym membership: sporadic visits won’t get you the results you want. The same goes for retainer care. When I first got my retainer, I was pretty casual about cleaning it (confession time!). But after noticing some funky smells and seeing how buildup could affect its fit, I got serious about my cleaning schedule.
Now that I’m religious about my baking soda cleaning routine, I’ve noticed a huge difference. Not only does my retainer stay fresh and clear, but my orthodontist says it’s maintaining its shape perfectly. Plus, knowing I’m preventing bacteria buildup helps me sleep better at night – literally!
Remember, every time you clean your retainer with baking soda, you’re not just cleaning it – you’re protecting your investment in your smile. Trust me, your future self (and your wallet) will thank you for being consistent!
My Final Thoughts on Baking Soda & Retainers
After years of experimenting with different cleaning methods (and spending way too much money on commercial cleaners!), I can confidently say that baking soda has been a game-changer for my retainer care routine. It’s amazing how something so simple, affordable, and environmentally friendly can work so effectively.
Looking back at my retainer journey, I wish I’d known about the baking soda method from day one. Not only has it saved me hundreds of dollars, but it’s also given me peace of mind knowing I’m taking the best care of my investment in my smile. The science behind it is solid, the technique is simple, and once you get into the routine, it becomes second nature.
Remember that retainer sitting in your bathroom right now? It’s not just a piece of plastic – it’s protecting your perfect smile that you worked so hard for. Give it the care it deserves with this gentle, natural cleaning method. Trust me, your retainer (and your wallet) will thank you!
Ready to give it a try? Start with the paste method I shared earlier, and don’t forget to be gentle. You’ve got this!
5 Things I Want You to Remember
After sharing all my tips and experiences with you, here are the most important things I’ve learned about cleaning retainers with baking soda:
- Save Money, Get Results: Forget those expensive commercial cleaners! A simple box of baking soda does the job just as well (if not better), and it’ll save you serious cash over time. I’ve been using this method for years, and my orthodontist always compliments how well-maintained my retainer is.
- The Science Works: That box of baking soda in your pantry is actually a cleaning powerhouse. Its natural alkaline properties fight odors while its gentle abrasiveness tackles stains without damaging your retainer. Science for the win!
- Choose Your Method: Whether you prefer the quick paste method for busy mornings or the relaxing soak method for deep cleaning, both work great! I personally switch between the two depending on my schedule and what my retainer needs.
- Gentle Does It: Trust me on this one – you don’t need to scrub hard! A light touch and consistent cleaning (once or twice a week) will keep your retainer in perfect condition. Think of it as giving your retainer a gentle massage, not a workout.
- Rinse, Rinse, Rinse: Nobody wants a mouthful of baking soda! Always rinse thoroughly until the water runs completely clear. I hold mine up to the light for a final check – a little extra attention here goes a long way.
Your Questions Answered: What I’ve Learned Along the Way
How often should I clean my retainer?
In my experience, daily rinsing is non-negotiable – it’s like brushing your teeth, just has to happen! For deep cleaning with baking soda, I do mine weekly, usually on Sunday evenings while watching TV. But remember, everyone’s mouth is different, so check with your orthodontist for personalized advice!
Can I use regular toothpaste to clean my retainer?
I made this mistake when I first got my retainer – big oops! Regular toothpaste left tiny scratches that became bacterial hideouts. Trust me, stick with gentle cleaners like baking soda. Your retainer will last much longer!
Is it safe to boil my retainer to clean it?
Please don’t! I cringe whenever I hear this suggestion. I had a friend who tried this and ended up with a warped retainer that looked like a potato chip. Stick to lukewarm water – your retainer (and wallet) will thank you.
How long do retainers typically last?
With proper care, they’re quite durable! Mine lasted seven years before needing replacement. The key is consistent, gentle cleaning and proper storage. Think of it as a long-term relationship – treat it right, and it’ll stick around!
Can I clean my retainer with vinegar?
Absolutely! I actually use this method when I notice calcium buildup. Mix equal parts water and white vinegar, soak for 15 minutes, and rinse really well. Just warning you – that vinegar smell is strong, but it works wonders!
What happens if I don’t clean my retainer regularly?
Let me tell you a story – I once went on vacation and forgot my cleaning supplies. After just a few days, my retainer started smelling funky and felt grimy. Regular cleaning prevents bacteria buildup, bad breath, and that embarrassing moment when someone points out your smelly retainer!
Can I use mouthwash to clean my retainer?
While it might seem like a good idea (I thought so too!), mouthwash can be pretty harsh. I tried it for a while and noticed my retainer started looking cloudy. Stick with baking soda – it’s gentler and more effective in the long run.
How do I remove white buildup on my retainer?
Ah, those pesky white spots! I use my “spa treatment” for this: equal parts warm water and white vinegar for about 15-20 minutes. Works like magic every time. Just remember to follow up with your regular baking soda cleaning routine.
Is it normal for my retainer to smell bad?
A slight morning smell is normal (just like morning breath), but anything persistent means it’s time for a better cleaning routine. Since starting my baking soda method, bad smells are a thing of the past!
Can I use baking soda to clean Invisalign aligners?
Yes, but be super gentle! I helped my sister with her Invisalign cleaning routine, and we found that a very light touch with the baking soda paste works great. These aligners are like delicate little gems – treat them with extra care!
This post may contain affiliate links. If you click on one of these links and make a purchase, I may earn a small commission at no extra cost to you. This helps support the blog and allows me to continue creating valuable content. Thank you for your support!
")

")


One Comment